
The real secret to keeping your camping gear organised isn't a massive garage—it's having a killer post-trip system. Getting the clean-and-audit process dialled in the minute you get home is what stops the dreaded "dump and run" habit that leads to chaos and wrecked gear.
Your Foundation for Smart Gear Storage
The most important part of any storage strategy kicks in the second your trip is over. I know, it's tempting to just drop everything in a corner and promise you'll deal with it "later," but that's where expensive mistakes are born. A methodical post-trip routine doesn't just keep you organised; it protects your investment and makes sure you're ready to go at a moment's notice.
Think of it less as tidying up and more as a crucial health check for your equipment. Unpacking right away is the best way to catch small issues before they become trip-ruining disasters.
The Unpack and Air Out Rule
Whatever you do, never leave gear packed away wet or dirty. Moisture is public enemy number one for tents, sleeping bags, and technical clothing. It leads to mould and mildew, which can permanently destroy fabrics and waterproof coatings.
As soon as you’re home, pitch your tent—in the garage, on a covered patio, even in the living room if you have to. Let it air out for at least 24 hours. You need to be certain every seam and corner is bone-dry before it gets packed away. Sleeping bags need the same treatment; unroll them and drape them over a chair or railing so the insulation can breathe and dry out. This is key to maintaining its loft and keeping you warm on the next trip.
A damp tent stuffed in its bag for just a few days can develop permanent mildew stains and a musty smell that's almost impossible to get rid of. Trust me, airing it out is the one non-negotiable step to making your shelter last.
Clean, Inspect, and Repair
Once everything is dry, it's time for a proper clean and inspection. Wipe down every single piece of equipment, from your tent poles to your cookware. Dirty pots and utensils can attract pests, and a mouse can chew through an expensive pack or tent in no time. A quick wash not only prevents this but also means your camp kitchen is good to go. For more specialised gear, like your RV's sewer hose, good RV sewer hose storage ideas are all about cleanliness to prevent odours and keep things ready for the next dump station.
This is also your chance to play detective. Look for tiny tears in your tent's mesh, check for a sticky zipper on your rain jacket, or spot a fraying strap on your backpack. It’s a hundred times easier to patch a small hole or lubricate a zipper in your garage than it is to discover the problem while setting up camp in the dark.
- Check Batteries: Always pull the batteries from headlamps, GPS units, and other electronics to stop corrosion in its tracks.
- Restock Consumables: Make a note of what you used from your first-aid kit or see how much fuel is left in your stove canister.
- Make a Repair List: I keep a running list on my phone of things that need a proper fix or need to be replaced.
By adopting this clean-and-audit mindset, storing your camping gear stops being a chore and becomes part of the adventure—the part that ensures the next one is even better.
Designing Your At-Home Gear Hub
Having a dedicated, organised spot at home for all your camping equipment is a total game-changer. It transforms packing from a last-minute, chaotic treasure hunt into a streamlined process. A well-designed gear hub isn't about having a massive amount of space; it’s about creating smart systems that work with what you've got, whether that's a whole garage or just a corner of an apartment closet.
The first, most crucial step is to get everything up off the floor. When it comes to storing camping gear, vertical space is your best friend. Look into installing some sturdy shelving units or even a versatile pegboard system. These solutions instantly open up your floor and, more importantly, make all your gear visible and easy to grab. No more digging through piles in a dark corner.
Choosing Your Core Storage System
For most of us, a modular system is the foundation of a great gear hub. You really can’t go wrong with clear plastic tubs. They’re brilliant for protecting your kit from dust, moisture, and pests, and you can see what’s inside without having to open a single lid.
The key is to categorise everything logically. Think of it as creating grab-and-go kits for each core camping function.
- The Camp Kitchen: This tub is for your stove, fuel, pots, pans, utensils, and all your cleaning bits.
- Your Sleep System: Chuck your tent, sleeping pads, pillows, and headlamps in here.
- Clothing & Rain Gear: A separate container for extra layers, waterproofs, and camp shoes keeps everything else clean and dry.
- First-Aid & Tools: This is where you consolidate your medical kit, multitool, tent repair supplies, and navigation gear.
Labelling each and every tub might seem like an obvious step, but trust me, it’s non-negotiable. It saves an incredible amount of time when you're hunting for one specific item. This system also doubles as a pre-trip checklist; a quick glance at your tubs tells you exactly what you have and what you might be missing.
Think of your at-home gear hub as a personal library for adventure. Everything has its place, it's easy to check items in and out, and you always know what you have on hand. Getting this right is the secret to faster, stress-free trip prep.
Not every bit of gear fits neatly into a plastic tub. For those bulky or oddly shaped items, you’ve got to get a bit creative. Ceiling-mounted racks are an amazing solution for things like kayaks, bulky camp chairs, or large duffels, keeping them completely up and out of the way.
If you have a backyard, the battle for space is real. This is especially true here in Australia, where the camping equipment market has actually seen consumption drop by 18.1%. A big reason for this is the lack of proper storage in modern homes, which pushes people towards more compact gear. If you have the room, exploring the best storage sheds for your backyard can be a fantastic way to protect your investment and keep everything organised.
Here's a look at some of the most common storage options to help you figure out what might work best for your setup.
Comparing Home Storage Solutions
Choosing the right storage method depends on your gear, budget, and how much space you're working with. This table breaks down the pros and cons of the most popular choices.
| Storage Method | Best For | Pros | Cons |
|---|---|---|---|
| Clear Plastic Tubs | Small to medium-sized gear, creating "kits" | Stackable, protects from dust/moisture, easy to see inside | Can become heavy, rigid shape doesn't fit all items |
| Pegboards | Tools, ropes, cooking utensils, frequently used items | Highly customisable, keeps things visible and accessible | Not suitable for heavy or bulky gear, requires wall space |
| Heavy-Duty Shelving | Bulky items, tents, sleeping bags, coolers | Strong and durable, maximises vertical space, adjustable | Can be expensive, requires significant floor/wall space |
| Ceiling Racks | Kayaks, large duffels, seasonal items | Frees up valuable floor space, ideal for long-term storage | Can be difficult to install and access, not for daily use |
| Outdoor Sheds | Storing everything in one dedicated space | Protects gear from elements, frees up indoor space | Requires yard space, significant upfront cost |
Ultimately, the best solution is often a mix of these methods. You might use tubs on shelves for most of your gear, a pegboard for your tools, and a shed for the really big stuff.
The flowchart below gives you a simple, post-trip process to follow before anything goes back into storage.
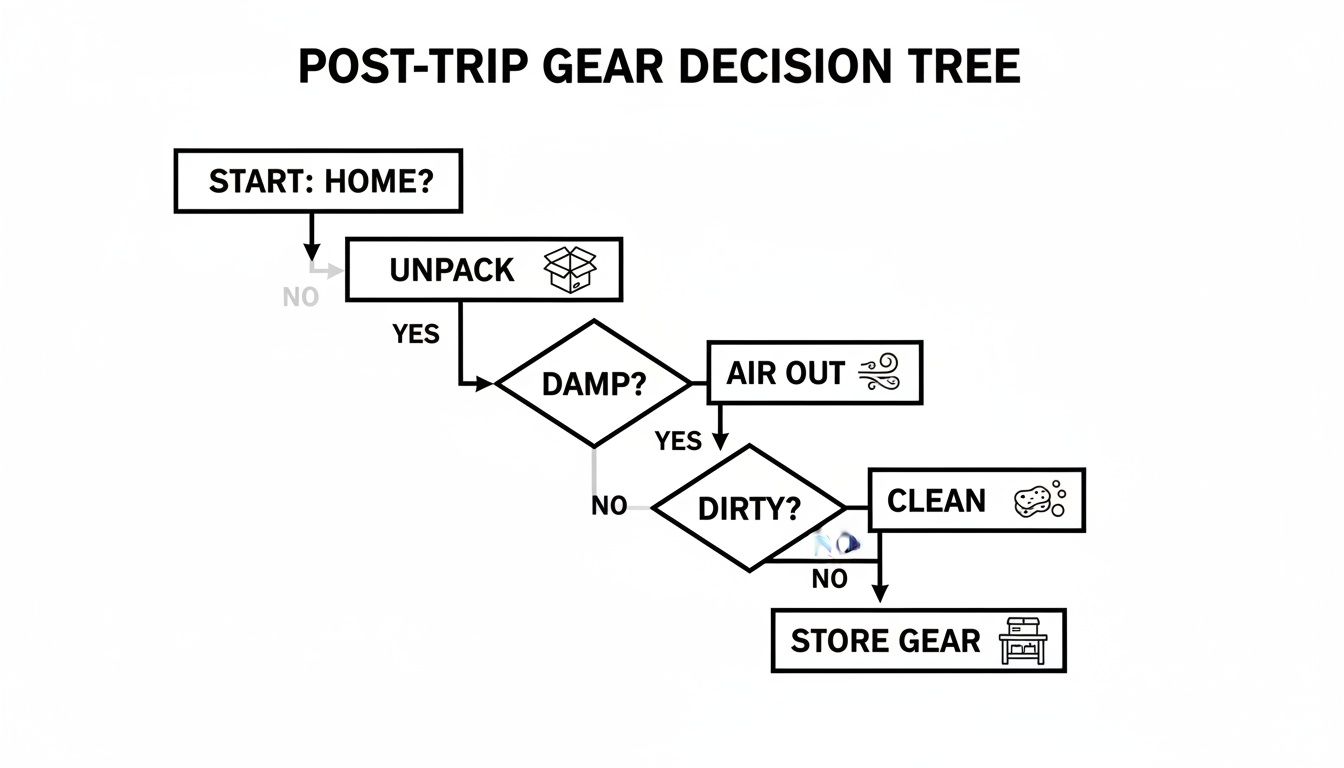
This little workflow is a lifesaver. It forces you to check every piece of gear for dampness and dirt before it gets put away, which is crucial for preventing mould, rust, and long-term damage. Building a habit like this ensures your gear is always clean, dry, and ready for the next adventure.
Tackling Bulky and Awkwardly Shaped Gear
Tents, sleeping bags, and camp chairs are the usual suspects when it comes to camping gear storage chaos. Their awkward shapes and sheer bulk can make organising them feel like a losing battle, but taming these items is simpler than you think. It all comes down to understanding what each piece of gear needs to maintain its performance and lifespan.
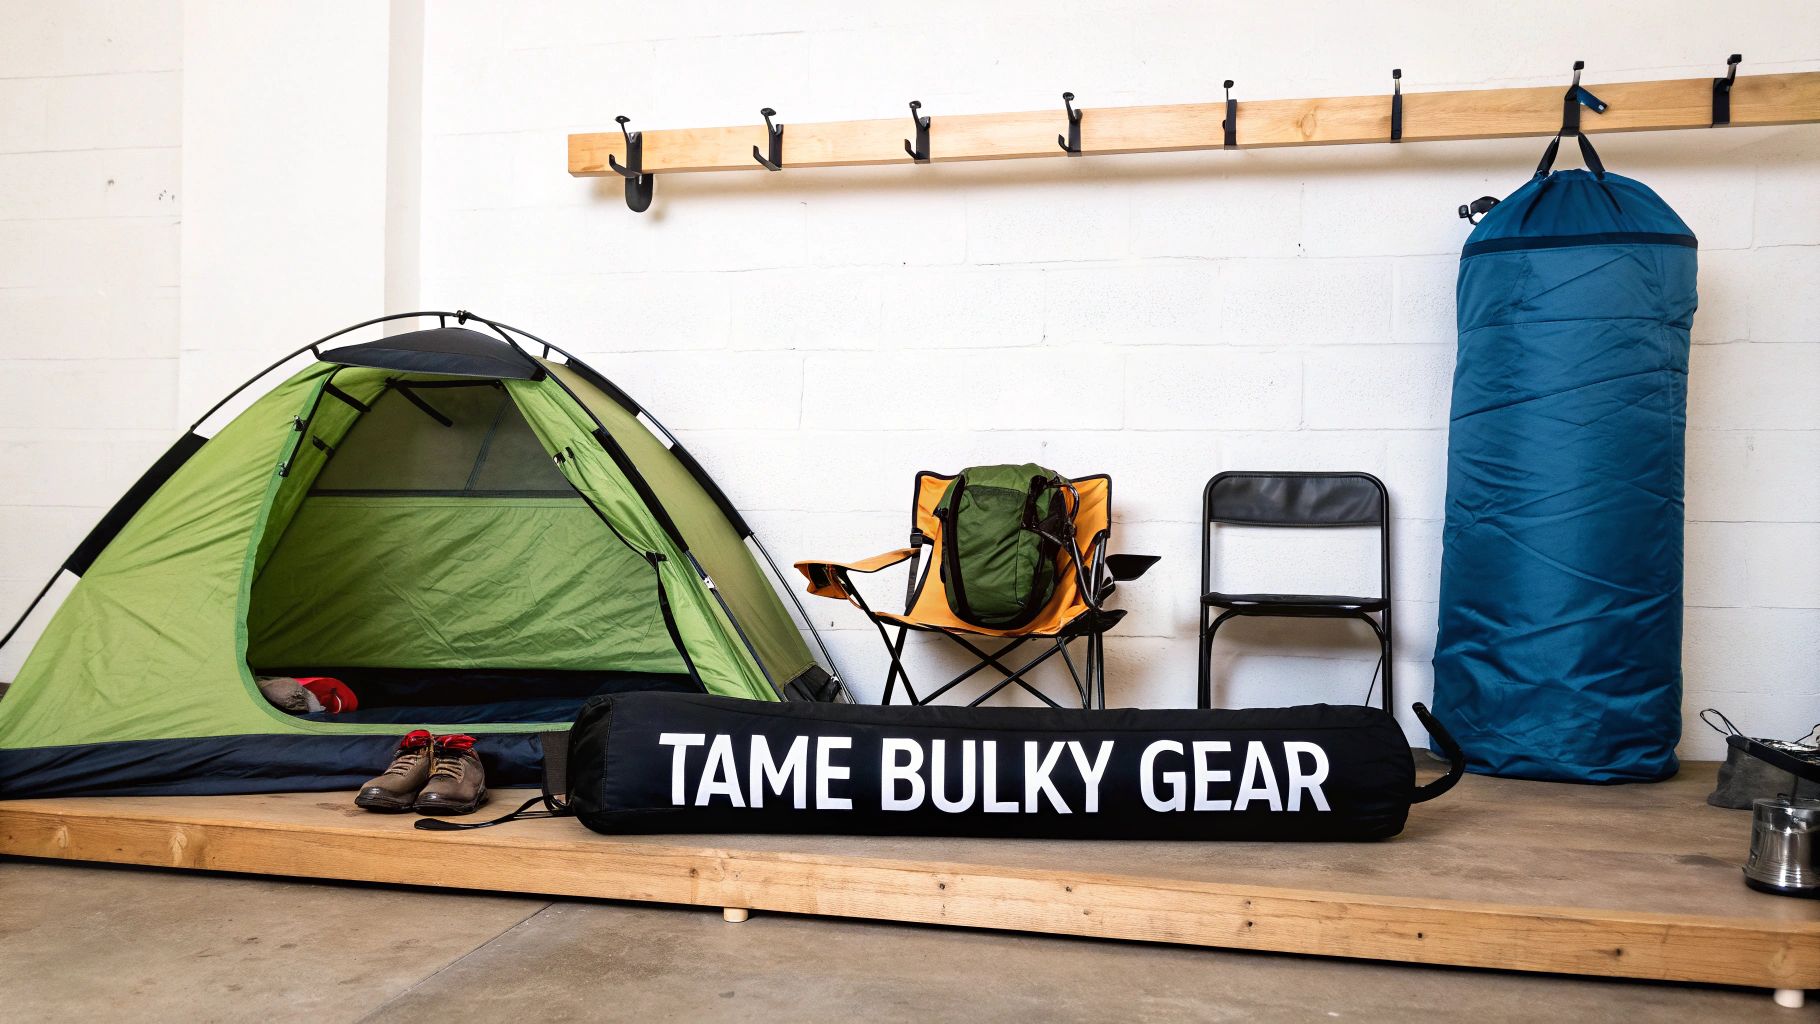
The first rule for bulky gear is to give it room to breathe. The tight stuff sacks that come with tents and sleeping bags are brilliant for saving space in your pack, but they are terrible for long-term storage at home. Continuous compression is the enemy of performance gear.
Storing Tents and Sleeping Bags Correctly
Let’s start with your tent. After ensuring it's completely dry, resist the urge to cram it back into its original bag. Tightly folding and compressing a tent can stress the fabric and, more importantly, degrade its waterproof coatings over time.
A much better approach is to loosely fold or roll it and place it in a larger, breathable storage sack. An old pillowcase or a dedicated mesh bag works perfectly for this. This allows air to circulate, preventing any residual moisture from turning into a problem and taking the pressure off the seams and coatings.
Your sleeping bag requires even more care. Its whole job is to keep you warm, and that ability depends entirely on its loft—the fluffiness of its insulation. Compressing it for months on end crushes this insulation, permanently reducing how well it works.
For the best possible care of your sleeping bag, you should:
- Hang It Up: If you have the closet space, the absolute best method is to hang your sleeping bag on a wide hanger, just like a winter coat.
- Use a Large Sack: The next-best option is a large mesh or cotton storage sack. These sacks allow the bag to remain uncompressed and let the insulation breathe. Most good bags actually come with one.
Never, ever store a sleeping bag in its compression stuff sack long-term. Doing so is the fastest way to ruin a good quality bag and find yourself shivering on your next trip. Think of it as letting your gear relax between adventures.
Creative Solutions for Awkward Items
Camp chairs, folding tables, and trekking poles are notorious space hogs. Because they don't fit neatly into bins, they often end up leaning in a corner, just waiting to fall over. The solution? Get them off the floor and onto the walls or ceiling.
Simple, sturdy wall hooks are perfect for hanging camp chairs. You can often hang two or three chairs from a single heavy-duty hook. For larger things like folding tables or even a camp kitchen chuck box, think about installing a small overhead rack in your garage or shed. This frees up so much valuable floor space.
This strategy also applies to your camp kitchen. While you can use a tub, think about how you can shrink its footprint in the first place. You could check out some of the best camping gadgets designed for efficiency. Investing in lightweight, nesting cookware like titanium pots and pans can dramatically reduce the space your kitchen kit occupies, making it far easier to store.
Creating Your Grab-And-Go Camp Kitchen
Nothing kills the vibe of a beautiful evening outdoors faster than digging through three different bags just to find a lighter or a clean fork. It’s a frustrating scavenger hunt we’ve all been on. The solution? A dedicated, self-contained kitchen kit that you can literally grab and go. This whole approach completely changes the packing game and simplifies your camping gear storage by keeping everything in one, easy-to-find spot.
The best way I’ve found to do this is with what old-school campers call a “chuck box.” It’s really just a classic term for a sturdy plastic tote or a purpose-built container that holds all your cooking essentials. This box becomes the permanent home for your stove, fuel, pots, pans, spices, and cleaning gear. When you get back from a trip, all you have to do is restock what you used, give everything a quick clean, and put the entire box away, ready for the next adventure.
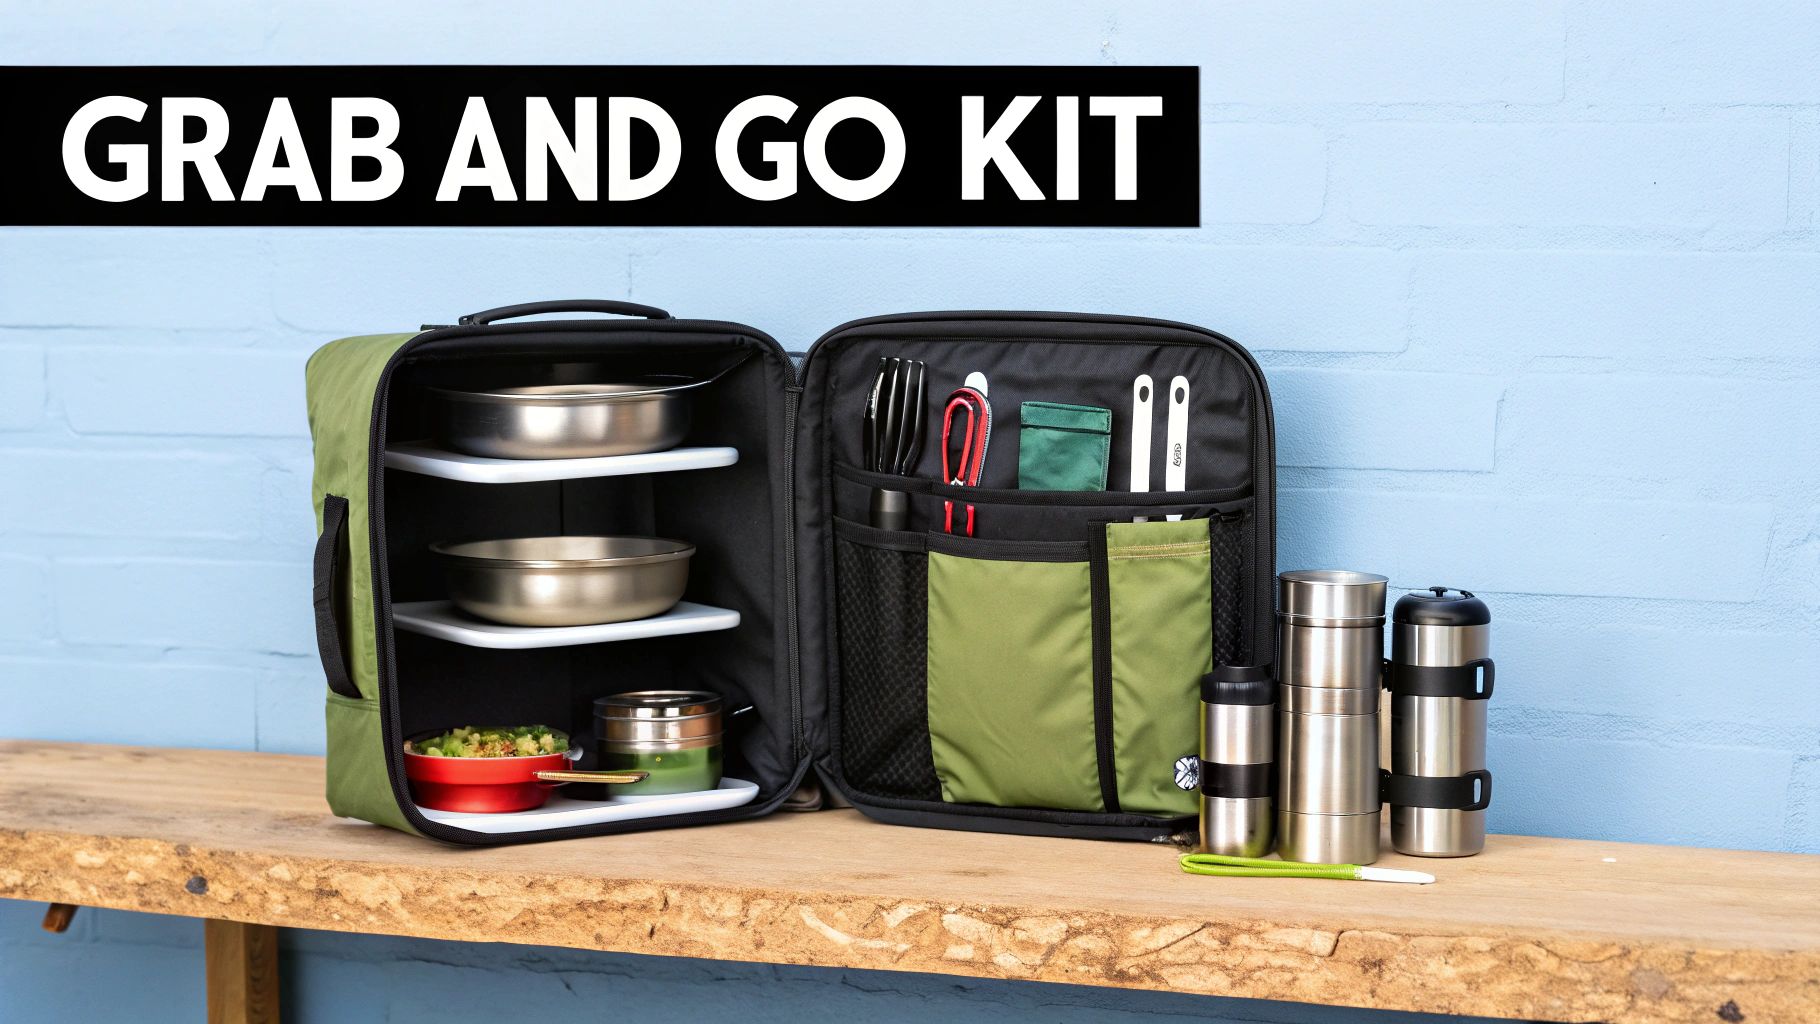
Assembling Your Kitchen Essentials
Your kit needs to be comprehensive enough to cook a decent meal but streamlined enough that you don't dread carrying it. Just think about everything you normally reach for when cooking outside and find a permanent place for it in your box. This is where making smart gear choices can make a massive difference.
- Cooking Gear: A compact stove is a must, along with at least one full fuel canister, a lighter, a small pot, and a frying pan.
- Utensils: Don’t forget a spatula, tongs, a large spoon for stirring, a sharp knife, and a can opener.
- Eating Essentials: Keep a dedicated set of plates, bowls, and cutlery just for this kit. Don’t borrow them from your home kitchen!
- Cleaning Station: A small bottle of biodegradable soap, a sponge, and a quick-dry towel are absolutely non-negotiable.
This organised approach really pays off, especially if you’re short on space at home. The storage woes for camping gear in Australia are often made worse by city living, with many of us in Melbourne and Sydney trying to find a spot for everything without a garage. It's no wonder there's been a shift towards owning ultra-durable, compact items. Everti's titanium tableware, for example, is microplastic- and BPA-free and nests together to save 50% more space than ceramic gear, which is perfect for families packing for a weekend escape from a small apartment.
The real goal of a grab-and-go kitchen is to eliminate thinking when you pack. If it's used for cooking or eating, it lives in the box. That one simple rule saves so much mental energy and pretty much guarantees you’ll never forget the salt again.
The Advantage of Space-Efficient Gear
Choosing gear that’s lightweight and nests together is the secret to an efficient and manageable camp kitchen. This is where materials like titanium really shine. A full set of titanium plates, bowls, and cutlery takes up a surprisingly small amount of room and weighs next to nothing, making your chuck box lighter and much easier to handle.
Beyond just being light, some materials offer extra benefits that are perfect for storage. A pure titanium cutting board, for instance, is naturally antibacterial and won't rust. That means you can give it a thorough clean at the campsite, and it won’t hold onto odours or degrade while it’s stored away. Investing in high-quality, dual-purpose gear like this is key. You can discover more about the benefits of using titanium camping cookware in our detailed guide. It doesn’t just make your setup more efficient; it ensures your kitchen gear stays hygienic and ready for adventure between trips.
Keeping Your Gear Adventure-Ready in Storage
Storing your camping gear properly isn't just about keeping the garage tidy. It's an active process of preserving your investment for the next trip. Think of it like putting your equipment into hibernation—it needs the right conditions to wake up ready for adventure.
A few proactive steps can mean the difference between gear that survives the off-season and gear that thrives. We’re talking about protecting technical fabrics from degrading and stopping metal parts from corroding.
A simple but crucial task? Get those batteries out of your headlamps, GPS units, and other electronics. A leaking battery can cause corrosive damage that will completely ruin sensitive circuits, turning a reliable gadget into a paperweight.
Creating the Ideal Storage Environment
Where you store your gear is just as important as what you store it in. The golden rule here is to find a place that’s cool, dry, and dark. Moisture and extreme temperatures are the biggest enemies of your camping equipment.
Steer clear of places with wild temperature swings, like an uninsulated attic or a backyard shed. The intense heat of an Aussie summer can literally melt the waterproof coatings on tents and rain jackets, leaving them sticky and useless. On the flip side, damp basements and garages are a perfect breeding ground for mould and mildew, which can permanently ruin fabrics and leave behind a smell you'll never get rid of.
Your gear's lifespan is directly tied to its storage conditions. A climate-stable spot like an interior closet or a spare room is always a better choice than a hostile environment like a damp shed or a scorching hot attic.
Proactive Maintenance for Specialised Gear
Some bits of kit need a little extra TLC before you pack them away for a few months. Your water filter, for instance, needs specific care to prevent nasty microbial growth while it sits unused. Always follow the manufacturer’s instructions for back-flushing and making sure it's bone dry before storing.
This is also a great time to appreciate gear that's naturally low-maintenance. Items made from pure titanium are brilliant because they inherently resist corrosion and don't hold onto smells. A quick clean is genuinely all they need before being put away. Making sure your titanium cutting board is spotless before you store it is incredibly simple; you can find the best methods for keeping your titanium cutting board clean in our guide.
This proactive approach ensures that when you pull your gear out, it’s in the exact same great condition you left it in. It turns your storage space from just a closet into a preservation chamber, keeping everything primed for your next adventure.
Before you put everything away for the season, a quick maintenance check can save you a lot of headaches later on. Here's a simple checklist to run through.
Seasonal Gear Maintenance Checklist
| Gear Category | Pre-Storage Task | Why It's Important |
|---|---|---|
| Tent/Tarp | Clean off all dirt, dry completely, and check for tears. | Prevents mould, mildew, and fabric degradation. Small tears can become big problems if left unfixed. |
| Sleeping Bag | Wash according to instructions and ensure it's fully dry. Store loosely in a large breathable bag. | Removes body oils and dirt that can break down insulation. Compression storage damages the loft over time. |
| Electronics | Remove all batteries from headlamps, GPS, and other devices. | Prevents battery leakage and corrosion, which can permanently damage the electronics. |
| Cookware | Thoroughly clean and dry all pots, pans, and utensils. | Prevents rust, corrosion, and lingering food odours that can attract pests. |
| Hydration | Clean and dry water bladders, bottles, and filters thoroughly. | Stops mould and bacteria from growing inside your water system. |
| Clothing | Wash and dry all technical apparel, especially waterproof-breathable gear. | Removes sweat and dirt that can clog fabric pores and reduce performance. |
Running through these simple checks ensures that when the urge for an adventure strikes, your gear is just as ready as you are.
Common Questions About Storing Your Camping Gear
Even with the best system, a few specific questions always seem to pop up about keeping your gear in top nick. Getting these details right can mean the difference between equipment that lasts for a decade and stuff that gives up the ghost after just a few seasons.
Let's tackle some of the most common dilemmas campers run into.
Should I Keep My Sleeping Bag in its Stuff Sack?
Definitely not. This is probably the single biggest mistake people make. Storing your sleeping bag tightly compressed in its stuff sack for months is a recipe for a cold night's sleep down the track.
The constant pressure completely crushes the delicate insulation, whether it's down or synthetic. Over time, that loft—the very thing that traps air and keeps you warm—is permanently lost.
For long-term storage, your sleeping bag needs to breathe and stay fluffy. The best way is to either hang it full-length in a wardrobe (a wide hanger works best) or pop it into the large, breathable mesh or cotton sack that it probably came with. This one simple habit will preserve its warming power for years.
How Do I Stop My Tent from Getting Mouldy?
Mould and mildew are the arch-nemeses of any tent. The golden rule here is to make sure your tent is 100% bone-dry before you even think about packing it away.
Even a tiny bit of trapped moisture can kickstart a mould infestation, which is a nightmare to get rid of and can ruin the fabric for good.
After every trip, I always pitch my tent in the garage or even the living room for a day or two. Let it air out completely, and double-check that all the seams and corners are totally dry before you store it loosely in its bag.
"The worst place to store your camping equipment is anywhere with extreme temperature swings and high humidity, like a non-climate-controlled attic or a damp basement. Heat degrades waterproof coatings, while humidity invites mould and rust."
What's the Best Way to Keep Pests Out of My Gear?
Pests can do some serious, irreversible damage. Your best bet is to store everything in sealed, hard-sided plastic bins. This is non-negotiable for anything that touches food.
Crucially, make sure all your cookware is spotless and that not a single crumb is left in any of your bags or kits. Mice have an incredible sense of smell and can chew through an expensive backpack just to get to a forgotten muesli bar wrapper.
If you're storing gear in a shed or garage where critters are more likely, tossing a few cedar blocks into your storage area can help deter them. It’s also just a good idea to check on your gear every so often, especially things made from natural fibres like wool or down.
At Everti, we design gear that simplifies storage and maintenance. Our pure titanium essentials are naturally corrosion-resistant, antibacterial, and don't retain odours, ensuring they are always clean and adventure-ready. Explore the full collection at https://everti.com.au.