

Lower back pain can feel like an unwelcome, persistent guest, disrupting everything from your daily jog to a good night's sleep. But what if you could take back control? Instead of merely reacting to discomfort, a proactive approach centred on targeted movement can fundamentally change your relationship with back pain. The key is not to stop moving; it is to move smarter.
The science is clear: strengthening the muscles that support your spine, such as your core, glutes, and back extensors, is one of the most effective strategies for achieving long-term relief. This isn't about gruelling workouts or pushing through intense pain. It’s about performing precise, gentle movements that restore muscular balance, improve your mobility, and build a resilient foundation for your spine. Many people find that incorporating the right kind of movement provides more sustainable relief than staying immobile.
This guide focuses specifically on eight good exercises for lower back pain, each selected for its proven ability to alleviate current discomfort and prevent future flare-ups. We will explore each movement in detail, explaining not just how to perform it correctly, but why it works for your body. This will empower you to build a safe, effective routine that feels restorative and puts you back in charge.
1. Cat-Cow Stretch
The Cat-Cow Stretch, known as Marjaryasana-Bitilasana in yoga, is a foundational dynamic movement highly recommended by physical therapists and spinal health experts. It's one of the most effective and gentle exercises for lower back pain because it focuses on mobilising the entire spinal column through a fluid, controlled motion. This exercise gently warms the spine, improves circulation to the discs between vertebrae, and helps alleviate stiffness and tension accumulated from prolonged sitting or inactivity.
The movement involves alternating between two positions: arching the back (Cow pose) and rounding the spine (Cat pose). This sequence promotes flexibility, relieves pressure on the lower back, and gently engages the core muscles, which are crucial for spinal support and stability.
How to Perform the Cat-Cow Stretch
Begin on a yoga mat or cushioned surface on your hands and knees, creating a tabletop position. Ensure your wrists are directly under your shoulders and your knees are aligned under your hips.
- Cow Pose (Inhale): As you inhale, drop your belly towards the floor, lift your chest and tailbone, and look forward. This creates a gentle arch in your spine.
- Cat Pose (Exhale): As you exhale, round your spine upwards towards the ceiling, tucking your chin to your chest and your tailbone under. Gently press your hands into the mat to deepen the stretch between your shoulder blades.
Flow between these two poses slowly and deliberately.
Key Implementation Tips
To maximise the benefits and ensure this remains a good exercise for lower back pain, focus on mindful execution.
Synchronise Your Breath: The power of this stretch is amplified when you coordinate your breathing with the movement. Inhaling during the Cow pose helps open the chest, while exhaling during the Cat pose aids in spinal flexion.
Perform 8-10 repetitions of the full cycle, aiming for 1-2 sessions daily, such as in the morning to relieve stiffness or in the evening to release tension. To deepen your understanding and explore variations of this gentle spinal mobilisation, you can also learn more about the Cat-Cow Stretch. Always move within a pain-free range of motion.
2. Bridges (Glute Bridge)
The Glute Bridge is a foundational strengthening exercise widely endorsed by physiotherapists and fitness professionals as a primary tool for combating lower back pain. It is a simple yet powerful movement that targets the posterior chain, specifically the gluteal muscles and hamstrings. This exercise is one of the best good exercises for lower back pain because it addresses a common underlying cause of discomfort: weak glutes forcing the lower back muscles to overcompensate and become strained.
By activating and strengthening the glutes, the Bridge helps to stabilise the pelvis and improve hip extension mechanics. This reduces the burden on the lumbar spine during daily activities like lifting, walking, or even standing. Regular practice helps correct poor postural habits and builds a stronger support system for your entire lower back, making it a cornerstone of rehabilitation and prevention programs.
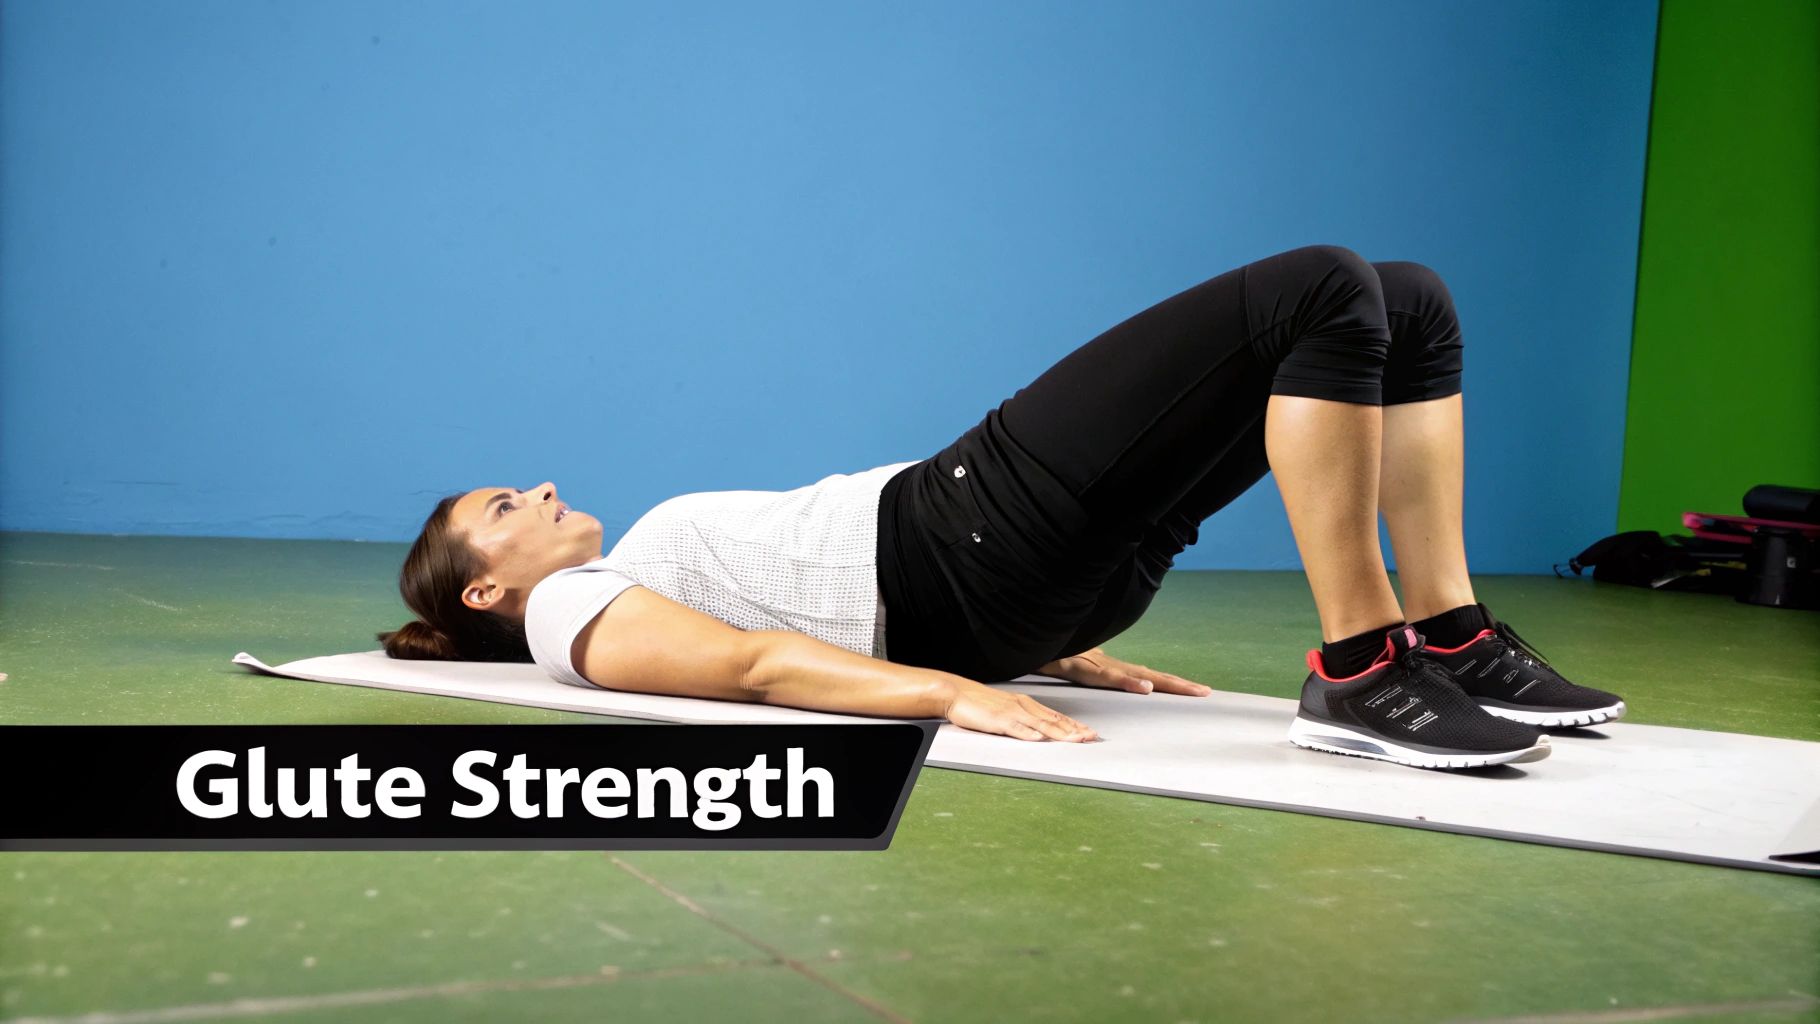
How to Perform the Glute Bridge
Begin by lying on your back on a mat or comfortable surface. Bend your knees and place your feet flat on the floor, about hip-width apart and close enough that your fingertips can just graze your heels. Rest your arms by your sides with your palms facing down.
- Lift (Exhale): Engage your core and glutes. As you exhale, press through your heels to lift your hips off the floor until your body forms a straight line from your shoulders to your knees.
- Hold and Lower (Inhale): Squeeze your glutes firmly at the top of the movement for 1-2 seconds. As you inhale, slowly lower your hips back to the starting position with control.
Repeat the movement for the desired number of repetitions, focusing on muscle engagement rather than speed.
Key Implementation Tips
To ensure the Glute Bridge is an effective and safe exercise for lower back pain, precise form is crucial.
Mind the Squeeze: The primary goal is glute activation. Consciously squeeze your gluteal muscles at the top of the lift to drive the movement, rather than using your lower back. Avoid arching or hyperextending your spine.
Aim for 2-3 sets of 12-15 repetitions. This exercise is excellent for warm-ups or as part of a core strengthening routine. For a detailed guide on the foundational Glute Bridges exercise, refer to this resource. Strong glutes not only protect your back but also improve your power for activities like hiking, which is a great way to stay active once your back feels stronger.
3. Dead Bug Exercise
The Dead Bug exercise is a deceptively challenging core stabilisation movement highly regarded in clinical physical therapy and Pilates programs. It is one of the safest and most effective good exercises for lower back pain because it teaches the body to maintain a stable spine while moving the limbs. This focus on deep core engagement helps build the foundational strength needed to protect the lumbar region from strain during daily activities.
This exercise strengthens the transverse abdominis, the deepest abdominal muscle that acts like a natural corset for your spine. By coordinating opposite arm and leg movements while keeping the torso perfectly still, you improve motor control and enhance lumbo-pelvic stability, which is essential for preventing and managing lower back discomfort.
How to Perform the Dead Bug Exercise
Lie on your back on a mat with your knees bent and feet flat on the floor. Raise your arms straight towards the ceiling, and lift your legs into a tabletop position with your knees bent at 90 degrees directly over your hips.
- Engage Your Core: Gently press your lower back into the floor, engaging your abdominal muscles to eliminate any arch.
- Lower Opposite Limbs: As you exhale, slowly lower your right arm and left leg towards the floor simultaneously. Go only as far as you can without your lower back arching off the mat.
- Return to Start: As you inhale, slowly bring your arm and leg back to the starting position with control.
- Alternate Sides: Repeat the movement on the other side, lowering your left arm and right leg.
Continue alternating sides in a slow, controlled manner.
Key Implementation Tips
To get the full benefit of this core exercise and ensure it helps rather than harms your back, focus on precise execution.
Maintain a Neutral Spine: The primary goal is to keep your lower back in contact with the floor throughout the entire movement. If you feel it start to arch, you have lowered your limbs too far.
Perform 2-3 sets of 10-12 repetitions per side. If the full version is too difficult, start with your feet on the ground and practise lowering one leg at a time. Quality is far more important than quantity, so move deliberately and breathe continuously.
4. Supine Figure-Four Stretch (Piriformis Stretch)
The Supine Figure-Four Stretch is a crucial static stretch that targets the piriformis muscle, a small but powerful muscle located deep within the gluteal region. Tightness in this muscle can compress the sciatic nerve, leading to sciatica-like symptoms such as pain, tingling, and numbness that radiate from the lower back down the leg. This makes it one of the most effective targeted exercises for lower back pain, especially when the pain originates from hip and gluteal tension.
By specifically isolating and lengthening the piriformis, this stretch helps to relieve nerve compression and release deep-seated tension in the hips. Physical therapists and yoga instructors frequently recommend it as part of a comprehensive routine to manage lower back discomfort and improve hip mobility, which is fundamental to maintaining a healthy, supported spine.
How to Perform the Supine Figure-Four Stretch
Begin by lying on your back on a comfortable, flat surface with your knees bent and feet flat on the floor.
- Position: Cross your right ankle over your left knee, creating a "figure-four" shape with your legs. Keep your right foot flexed to help protect your knee joint.
- Stretch: Gently lift your left foot off the floor. Thread your right hand through the space between your legs and your left hand around the outside of your left thigh. Clasp your hands behind your left thigh and gently pull it towards your chest until you feel a comfortable stretch in your right glute and hip.
Hold the stretch for 30-60 seconds while breathing deeply, then release and repeat on the other side.
Key Implementation Tips
To get the most out of this good exercise for lower back pain, focus on proper form and gentle execution.
Breathe into the Stretch: Deep, diaphragmatic breathing is essential. As you exhale, try to relax deeper into the stretch, allowing the piriformis muscle to release more fully. This mindfulness enhances the stretch's effectiveness and promotes relaxation.
Perform this stretch 2-3 times on each side, particularly after periods of prolonged sitting or as part of your cool-down routine. For those with limited flexibility, a modification is to keep the bottom foot on the floor and gently press the bent knee away from the body. You can also explore other ways to improve leg flexibility with dynamic stretches for your legs. Always listen to your body and avoid any movement that causes sharp pain.
5. Bird Dog Exercise
The Bird Dog is a classic core stability exercise widely endorsed by physical therapists and athletic trainers for its effectiveness in building a resilient lower back. This movement trains the body to stabilise the lumbar spine while the limbs are in motion, directly challenging the deep core muscles that protect your back during everyday activities like walking, lifting, and twisting. It is an exceptionally good exercise for lower back pain because it strengthens the erector spinae muscles without placing excessive load on the spine.
This exercise enhances proprioception, your body's awareness of its position in space, which is vital for preventing re-injury. By requiring you to maintain a neutral spine while extending an opposite arm and leg, the Bird Dog builds endurance in the muscles responsible for maintaining posture and pelvic alignment, making it a cornerstone of both rehabilitation and preventative care programs.
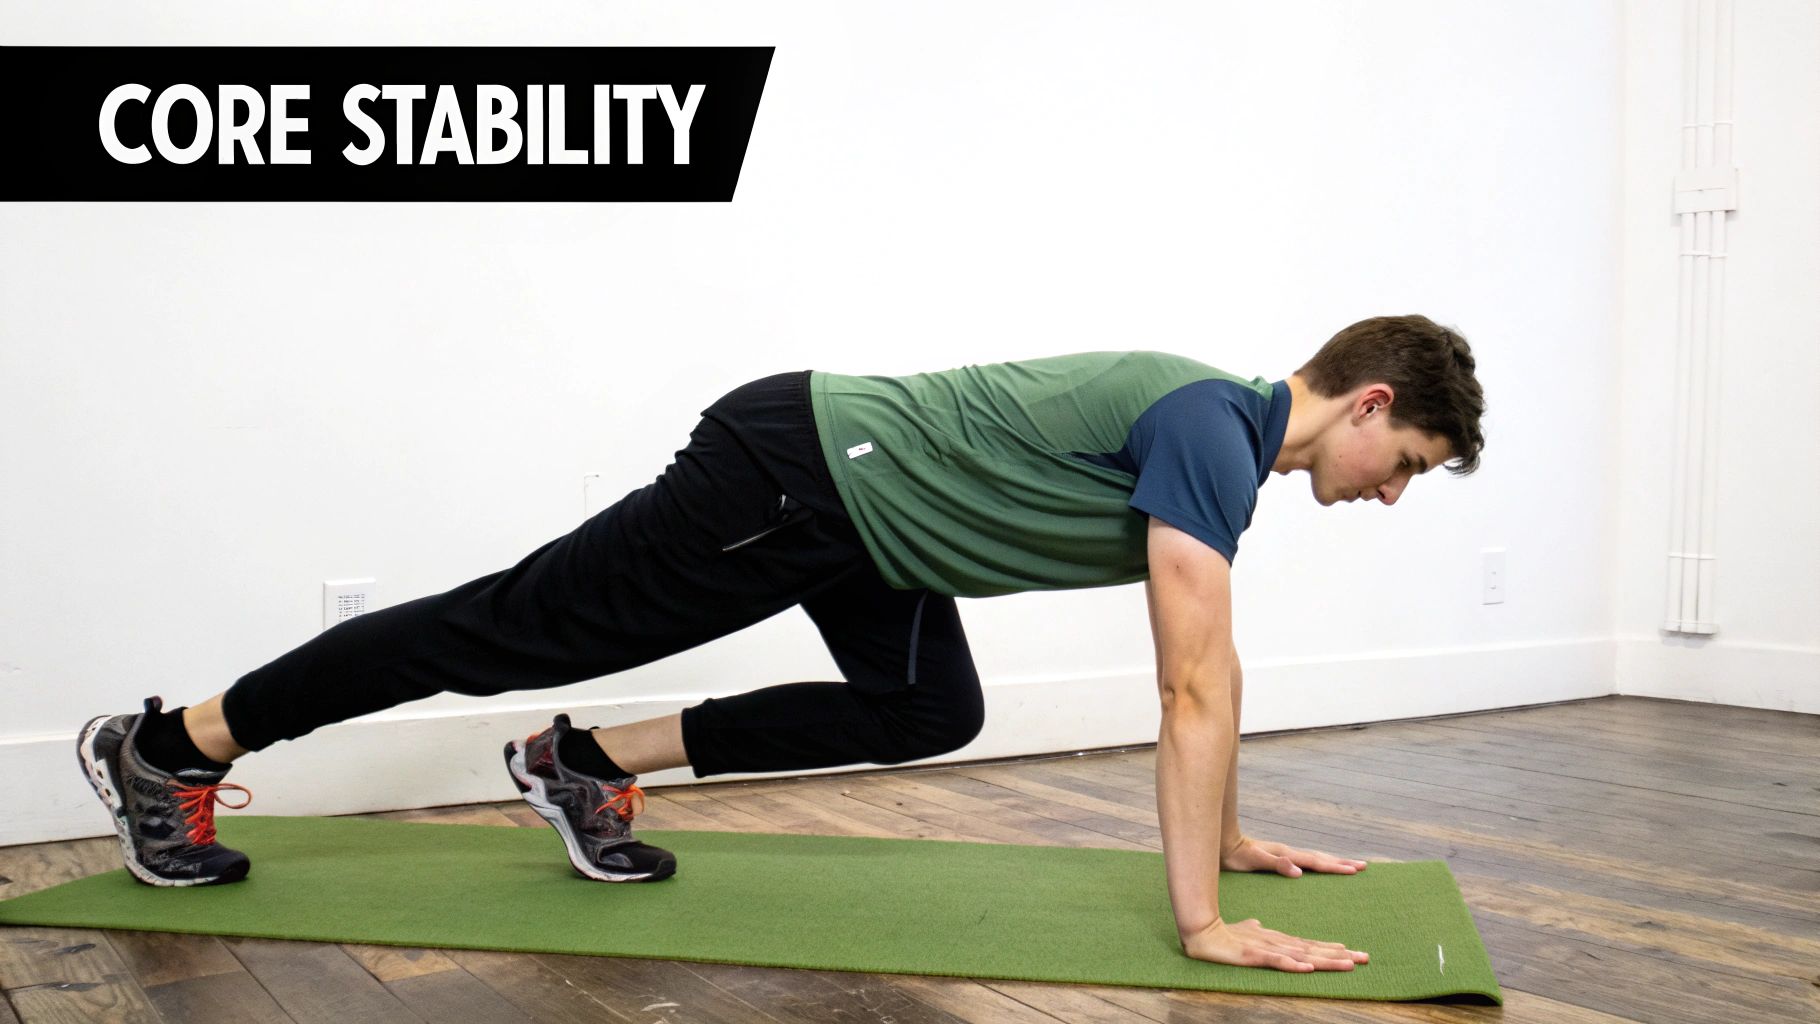
How to Perform the Bird Dog Exercise
Start on all fours in a tabletop position, similar to the Cat-Cow stretch. Your hands should be directly beneath your shoulders and your knees directly beneath your hips. Keep your back flat and your neck in line with your spine.
- Engage Core: Brace your abdominal muscles as if you are about to be punched in the stomach.
- Extend Limbs: Slowly and simultaneously extend your right arm straight forward and your left leg straight back. Keep both parallel to the floor.
- Hold and Return: Hold the extended position for 1-2 seconds, focusing on keeping your torso and hips perfectly still. Slowly lower your arm and leg back to the starting position with control.
- Alternate Sides: Repeat the movement on the opposite side, extending your left arm and right leg. This completes one repetition.
Key Implementation Tips
To get the most out of this movement and ensure it remains a good exercise for lower back pain, precision is more important than speed.
Prevent Pelvic Rotation: The primary goal is to keep your torso and hips completely level, as if you were balancing a glass of water on your lower back. Avoid any rocking or tilting from side to side.
Perform 10-12 repetitions per side, aiming for 2-3 sets. Start with slow, controlled movements to master the form before considering progressions like adding light ankle weights. Using a mirror to monitor your hip alignment can be incredibly helpful when you first begin.
6. Pelvic Tilts
The Pelvic Tilt is a subtle yet powerful foundational exercise often prescribed by physical therapists and Pilates instructors as a first step in treating lower back pain. This gentle mobilisation exercise focuses on the lumbar spine and pelvis, teaching proper spinal awareness and engaging the deep core muscles that support the lower back. It is particularly effective for reducing excessive lumbar curvature (lordosis) and relieving tension built up from poor posture.
Performed while lying on the back, the movement involves gently rocking the pelvis to flatten the lower back against the floor and then returning to a neutral position. This controlled action isolates the deep abdominal muscles, such as the transverse abdominis, without straining the back, making it one of the safest and most good exercises for lower back pain, especially during acute flare-ups.
How to Perform Pelvic Tilts
Lie on your back on a mat or a firm surface with your knees bent and feet flat on the floor, hip-width apart. Keep your arms relaxed by your sides.
- Engage (Exhale): As you exhale, gently flatten your lower back against the floor by tightening your abdominal muscles. Imagine you are trying to pull your belly button towards your spine. Your pelvis will slightly rock or tilt backwards.
- Release (Inhale): As you inhale, relax your abdominal muscles, allowing your pelvis to return to its starting neutral position. There should be a small, natural curve under your lower back.
Repeat this small, controlled rocking motion without using your legs or glutes to push.
Key Implementation Tips
To get the most out of this foundational exercise, focus on precision and control rather than the size of the movement.
Focus on Muscle Engagement: The primary goal is to activate the deep abdominal muscles. The tilting of the pelvis is the result of this engagement, not the goal itself. Avoid arching your back excessively when you release.
Perform 2-3 sets of 12-15 repetitions daily. Pelvic Tilts serve as an excellent warm-up before other core exercises or as a gentle way to relieve stiffness in the morning. For those interested in how the body interacts with different materials, from exercise equipment to medical implants, you can learn more about material biocompatibility. Always ensure the movement is slow, controlled, and pain-free.
7. Quadruped Opposite Arm-Leg Raise (Superman Alternative)
The Quadruped Opposite Arm-Leg Raise, often called the "Bird-Dog," is a core stabilisation exercise widely endorsed by physical therapists and functional movement coaches. It's a highly effective and safe way to strengthen the deep muscles that support your spine, including the erector spinae, glutes, and abdominals. Unlike the traditional "Superman" exercise which can hyperextend the back, this movement promotes a neutral spine, making it one of the best good exercises for lower back pain.
This exercise builds stability by challenging your body's ability to resist rotational forces while your limbs are in motion. By simultaneously engaging the muscles of the back, hips, and core, it improves coordination and proprioception (your body's awareness in space), which is fundamental for preventing re-injury and maintaining proper posture throughout daily activities.
How to Perform the Quadruped Opposite Arm-Leg Raise
Start on your hands and knees in a tabletop position on a comfortable surface. Align your hands directly under your shoulders and your knees directly under your hips. Keep your back flat and engage your abdominal muscles.
- Extension: Slowly extend your right arm straight forward and your left leg straight back at the same time. Keep both parallel to the floor.
- Hold and Lower: Hold the position for 1-2 seconds, focusing on keeping your torso and hips perfectly still.
- Return: Gently lower your arm and leg back to the starting position with control.
- Repeat: Perform the same movement on the opposite side, extending your left arm and right leg.
This constitutes one repetition. Continue alternating sides for the desired number of reps.
Key Implementation Tips
To get the most out of this exercise and ensure it remains beneficial for your lower back, focus on control and stability over speed.
Maintain a Level Torso: The primary goal is to prevent your hips and lower back from rotating or sagging. Imagine you have a glass of water balanced on your lower back that you don't want to spill.
Aim for 2-3 sets of 10-12 repetitions per side. As you get stronger, you can progress the exercise by increasing the hold time at full extension or adding light ankle and wrist weights. For a detailed guide on perfecting this movement, you can explore the Bird-Dog exercise and its variations. This focus on form makes it an excellent good exercise for lower back pain management and prevention.
8. Sphinx Pose (Gentle Backbend)
The Sphinx Pose, known as Salamba Bhujangasana in yoga, is a restorative and gentle backbend highly valued in physical therapy and yoga for lumbar health. It is considered one of the best good exercises for lower back pain because it encourages mild spinal extension, which can help realign the vertebrae, improve posture, and counteract the effects of prolonged forward flexion, such as slouching over a desk. This pose strengthens the back muscles while gently stretching the abdominal muscles and chest.
Unlike more intense backbends, the Sphinx Pose provides a controlled and supportive way to introduce extension to the lumbar spine, promoting circulation to the spinal discs and reducing stiffness without excessive pressure. It is often incorporated into therapeutic routines to help manage disc-related discomfort and build foundational back strength.
How to Perform the Sphinx Pose
Begin by lying on your stomach on a yoga mat or comfortable surface, with your legs extended straight behind you, hip-width apart.
- Place your elbows directly under your shoulders and your forearms flat on the floor, parallel to each other.
- Gently press your forearms and palms into the floor to lift your head and chest off the ground, creating a gentle arch in your back.
- Keep your neck in a neutral position, looking forward or slightly down to avoid strain. Engage your abdominal muscles slightly to support your lower back.
Hold this position, breathing deeply and evenly.
Key Implementation Tips
To ensure the Sphinx Pose remains a safe and effective exercise for lower back pain, focus on proper alignment and mindful execution.
Control the Extension: The goal is a gentle, pain-free arch. If you feel any pinching or sharp pain in your lower back, lower your chest slightly. The support from your forearms allows you to easily control the intensity of the backbend.
Hold the pose for 15-30 seconds initially, gradually working up to a minute as you feel more comfortable. Practise this pose 1-2 times daily to gently mobilise your spine and relieve tension. Always listen to your body and avoid pushing into any position that increases your pain.
8-Exercise Comparison for Lower Back Pain
| Exercise | Complexity 🔄 | Resources ⚡ | Expected outcomes 📊 | Ideal use cases 💡 | Key advantages ⭐ |
|---|---|---|---|---|---|
| Cat-Cow Stretch | Very low — simple flowing movement | None (mat recommended) | Improves spinal mobility & reduces stiffness — ⭐⭐ | Warm-ups, daily mobility, beginners, acute stiffness | Low-impact; accessible; promotes spinal fluidity |
| Bridges (Glute Bridge) | Low — technique-dependent for glute activation | Minimal (mat; progress with weight) | Strengthens glutes, improves hip extension & reduces lumbar load — ⭐⭐⭐ | Glute strengthening, lower‑back support, rehab & fitness warm-ups | Scalable progressions; reduces lumbar stress |
| Dead Bug Exercise | Moderate — demands controlled, slow movement | None (mat) | Builds deep core stability and spinal control — ⭐⭐⭐ | Core rehab, chronic back pain management, motor‑control training | Excellent core stabilization; teaches neutral spine |
| Supine Figure‑Four Stretch (Piriformis) | Low — simple but flexibility‑dependent | None (mat; strap optional) | Targets piriformis and relieves sciatic tension — ⭐⭐ | Sciatica relief, hip opening, post‑activity stretching | Direct deep‑glute stretch; adjustable intensity |
| Bird Dog Exercise | Moderate — requires balance and coordination | Minimal (mat; optional light weights) | Improves spinal stability, proprioception & back‑extensor strength — ⭐⭐⭐ | Rehab stabilization, functional training, posture correction | Enhances balance and safe posterior chain strength |
| Pelvic Tilts | Very low — foundational pelvic control | None (mat); safe for pregnancy | Teaches pelvic control and reduces excessive lordosis — ⭐⭐ | Beginners, acute pain relief, warm‑ups, prenatal programs | Highly accessible; builds spinal awareness |
| Quadruped Opposite Arm‑Leg Raise | Moderate — diagonal control and balance required | Minimal (mat; optional resistance) | Strengthens posterior chain and back extensors safely — ⭐⭐⭐ | Safer back strengthening, functional training, rehab | Safe alternative to prone Superman; scalable |
| Sphinx Pose (Gentle Backbend) | Low — passive hold, monitor symptom response | None (mat) | Gentle spinal extension, mild back strengthening & relaxation — ⭐⭐ | Restorative yoga, mild extension mobility, posture counteraction | Restorative; low‑load extension; holdable for longer durations |
Your Next Steps Toward a Stronger, Pain-Free Back
You now possess a powerful toolkit of eight fundamental exercises designed to alleviate discomfort and build lasting resilience against lower back pain. From the gentle spinal mobilisation of the Cat-Cow stretch to the core-stabilising challenge of the Bird Dog, each movement offers a unique pathway toward improved strength, flexibility, and overall spinal health. The journey to a pain-free back is not a sprint; it's a marathon built on mindful, consistent effort.
The key takeaway is that managing and preventing lower back issues hinges on a holistic approach. It’s about more than just performing a few stretches when pain strikes. It’s about creating a sustainable routine that integrates core stability (Dead Bug, Bird Dog), glute activation (Glute Bridges), and gentle mobility (Pelvic Tilts, Sphinx Pose) into your regular schedule. These aren't just temporary fixes; they are foundational practices for long-term well-being.
Building Your Personalised Back-Care Routine
So, where do you go from here? The most crucial step is to start. Don't feel pressured to master all eight exercises at once. Instead, adopt a gradual, intelligent approach:
- Start Small: Choose two or three exercises that feel most comfortable and accessible for your body. The Pelvic Tilt and Glute Bridge are excellent starting points for re-engaging core and gluteal muscles with minimal strain.
- Prioritise Form: The quality of your movement is far more important than the quantity. Focus on the precise execution described for each exercise. It is better to perform five perfect repetitions than fifteen sloppy ones. Consider practising in front of a mirror initially to check your alignment.
- Listen to Your Body: This is non-negotiable. Exercise should alleviate pain, not create it. Pay close attention to any signals of sharp, shooting, or increasing pain. Mild muscle fatigue is normal, but acute discomfort is a sign to stop and reassess.
- Create a Habit: Consistency is the cornerstone of success. Aim to incorporate your chosen exercises into your daily routine, perhaps for 10-15 minutes in the morning to awaken your muscles or in the evening to decompress from the day.
The Bigger Picture: Proactive Spinal Health
By committing to these good exercises for lower back pain, you are making a profound investment in your future. You are not just managing symptoms; you are building a stronger, more resilient foundation that supports every movement you make. This proactive approach empowers you to reclaim activities you may have been avoiding, from gardening and playing with your children to simply sitting at your desk without discomfort.
Remember, consulting a healthcare professional, such as a physiotherapist or your GP, before beginning any new fitness program is always the wisest course of action, especially if your pain is chronic or severe. They can provide a personalised diagnosis and ensure these exercises are appropriate for your specific condition. Take these steps with confidence, knowing that each mindful movement brings you closer to a life with greater freedom, strength, and comfort.
Ready to enhance your recovery and daily comfort? Proper posture and support are just as crucial as exercise. Discover the ergonomically designed chairs and wellness products from Everti that complement your fitness routine by promoting optimal spinal alignment throughout your day. Explore their range at Everti to build a complete support system for a healthier back.