
Let's be honest, poaching an egg the old-fashioned way can feel like a bit of a culinary gamble. You stand over a pot of swirling, simmering water, hoping this time you’ll get that perfect, delicate orb instead of a wispy, watery mess.
It's a finicky technique that often leads to runaway egg whites, accidentally broken yolks, and a whole lot of frustration. It takes practice, patience, and often a little bit of luck to get it just right.
This is exactly where a dedicated poacher for eggs steps in to save your breakfast. It’s designed to take all the guesswork out of the process, giving you perfectly shaped, consistently cooked poached eggs every single time. It does this by using individual cups to gently steam the eggs, which means solid whites and beautifully runny yolks are practically guaranteed.
Why Use a Poacher for Eggs?
Think of it this way: poaching an egg in a saucepan is like trying to draw a perfect circle freehand. Sometimes you get close, but it’s often a bit wobbly and unpredictable. Using an egg poacher is like using a compass—it provides the structure and control you need for a flawless result, every time.
It transforms what can be a stressful kitchen task into a simple, reliable, and repeatable process.
A Quick Comparison
To see the difference clearly, here’s a quick breakdown:
Traditional Poaching vs Using an Egg Poacher
| Aspect | Traditional Method (in a saucepan) | Using a Poacher for Eggs |
|---|---|---|
| Process | Involves creating a vortex in simmering water, sometimes with vinegar. Requires careful timing and technique. | Crack eggs into individual cups, place in a pan with a little water, and cover to steam. |
| Consistency | Results can vary wildly. Often produces wispy whites and unevenly cooked eggs. | Delivers uniform, perfectly rounded eggs with consistently cooked whites and yolks. |
| Ease of Use | Can be challenging for beginners and even experienced cooks. High margin for error. | Extremely simple and foolproof. Ideal for cooks of all skill levels. |
| Clean-up | Can leave behind messy egg white residue in the saucepan. | Non-stick cups make for a quick and easy clean-up. Eggs slide right out. |
As you can see, the poacher simplifies things dramatically, making it a far more reliable tool for your morning routine.
Control and Consistency Every Time
The biggest win when using a poacher for eggs is the incredible control it gives you. Instead of dropping a delicate egg into a chaotic pot of water and crossing your fingers, you crack it into a secure, contained cup.
This one simple change solves the most common poaching headaches:
- No More Wispy Whites: The cups hold the egg white neatly around the yolk, creating that tidy, café-style shape.
- Guaranteed Intact Yolks: There's zero risk of the yolk breaking when it hits the water.
- Uniform Cooking: The gentle steam cooks the eggs evenly, so you avoid the rubbery texture that can happen in boiling water.
By creating a structured environment for the egg, a poacher removes all the tricky variables that make the traditional method so difficult. It’s less about mastering a complex skill and more about following a few simple steps.
An Effortless Process for Any Home Cook
Modern egg poachers are designed with convenience in mind, and that usually means a non-stick surface. This makes both the cooking and the cleaning an absolute breeze. If you're curious about how these surfaces work, you can learn more about the science behind non-stick cookware.
This ease of use puts perfect poached eggs on the menu for everyone, from complete beginners to seasoned chefs who just want a faster, more dependable method on a busy morning. At the end of the day, it’s all about getting those café-quality results without the café-level effort.
Choosing the Right Egg Poacher for You
Let's be honest, not all egg poachers are built the same. When you start looking, it can feel like there are a million different options, but picking the right one for your kitchen is actually pretty straightforward. It all boils down to your cooking style, how many mouths you're usually feeding, and what you prioritise: speed, versatility, or sheer capacity.
There are really three main players on the field, and each has its own unique strengths. Think of it like picking the right tool for the job – once you know what each one does best, you can make a choice you’ll be happy with every time you crave a perfectly poached egg.
Stovetop Pan Inserts: The Team Player
First up, we have the classic stovetop insert. This is probably what most people picture: a non-stick pan that comes with a set of individual cups and a lid. It’s the reliable team player, built to cook several eggs at once, all to the exact same perfect finish.
You just add a little water to the bottom of the pan, crack your eggs into the cups, pop on the lid, and let the steam do all the hard work. This method is an absolute game-changer for families or when you're hosting brunch, making sure everyone gets a hot, perfectly cooked egg at the same time. The design takes all the guesswork out of the process.
Silicone Pods: The Versatile Soloist
Next are the individual silicone pods. These are the flexible, versatile solo artists of the poaching world. They’re small, colourful cups that you float directly in any pot of simmering water. You can use a single one for a quick breakfast for yourself or pop a few into a larger pot when you have company.
Their biggest selling point is their sheer flexibility. You don’t need a dedicated pan, and you can even float one in a pot of simmering soup to cook an egg right into your meal. They're also super compact and easy to store, making them a brilliant choice for smaller kitchens. If you're hunting for a great all-rounder, our detailed guide on the best egg poacher in Australia is a fantastic place to start.
Electric Poachers: The Automated Assistant
Finally, we have countertop electric egg poachers. Think of these as your personal automated breakfast assistant. They operate completely independently of your stovetop and are all about maximum convenience. Just add water, place your eggs in the tray, and hit a button.
The machine takes care of the timing and temperature, usually shutting itself off when your eggs are perfectly cooked. This makes them a brilliant option for hectic mornings or for anyone who just loves a good kitchen gadget that makes life easier. The result is consistently perfect eggs with virtually no effort.
This handy decision tree can help you picture which path to perfect eggs best fits your lifestyle.

As the infographic shows, if you're after guaranteed results with minimal fuss, a dedicated poacher is the way to go. While you can certainly use a standard pot, it introduces variables that a purpose-built poacher is designed to control. That kind of reliability is key for anyone wanting café-quality eggs at home, whether your eggs come from a major supermarket or a local farm. While large companies are a big part of the Australian egg industry, smaller producers in New South Wales, Queensland, and Victoria—which together house 86.9% of the national flock—are the heart of many local food communities.
How to Use Your Egg Poacher Step by Step

Using a poacher for eggs is one of those simple kitchen hacks that completely changes the game. It takes all the guesswork out of a notoriously tricky task, ditching the vinegar swirls and wispy whites for a clean, predictable result. With this tool, you get all the structure you need for a perfect poach.
These steps are for the classic stovetop pan-and-insert style, but honestly, the basic idea—gentle steaming—is the same whether you’re using a silicone pod or a fancy electric model. Let’s crack on.
Preparation is Key
Don't skip the prep. A minute of work before the heat even comes on is the secret to getting those eggs to slide right out of the cups without a fuss. It really does make all the difference.
- Add Water to the Pan: Just pour 1-2 centimetres of water into the main pan. You only need enough to create a nice, steamy environment, not so much that it bubbles up and boils the bottoms of the eggs.
- Lightly Grease the Cups: This is my non-negotiable tip for a clean release. Even with a non-stick coating, a tiny bit of butter, a wipe of oil, or a quick spritz of cooking spray makes the surface foolproof.
- Place the Insert: Pop the poaching cup insert into the pan over the water. That's it—you're ready for the main event.
The Poaching Process
With your setup sorted, the actual cooking part is a breeze. It's all about gentle heat and getting your timing down for that perfect yolk.
Step 1: Bring Water to a Simmer
Put the pan on the stove over medium heat. You’re looking for a gentle simmer—think small, slow bubbles, not a frantic, rolling boil. Boiling too hard will just make the whites tough and rubbery.
Step 2: Crack the Eggs
Gently crack an egg into each greased cup. For what it’s worth, the freshest eggs always poach best. Their whites are tighter and hold a much better shape.
Step 3: Cover and Cook
Put the lid on. This is crucial because it traps the steam, which then circulates to cook the top of the egg at the same time as the bottom. Now, we just wait.
The real magic of a poacher is that it lets the steam do all the work. By trapping it with the lid, you get that wonderfully delicate texture—a firm white that perfectly encases a gooey, liquid gold yolk.
Nailing the Perfect Cooking Time
How long you cook the eggs is purely down to personal preference. Every stove is a bit different, so use these times as your guide and tweak by 30 seconds or so until you find your sweet spot.
- For a Runny Yolk: Aim for 4-5 minutes. This gets you a beautifully set white with a completely liquid yolk, just begging for a soldier of toast.
- For a Jammy Yolk: Let it go for about 6 minutes. The result is a gorgeous, custardy centre—not fully runny, but definitely not hard. My personal favourite.
- For a Firm Yolk: You’ll need 7-8 minutes. This cooks the yolk all the way through, giving you a result similar to a hard-boiled egg.
When the timer goes off, use a spoon or a small spatula to gently lift each egg out of its cup. Serve them up straight away and enjoy—you've just mastered one of breakfast's greatest pleasures with your trusty poacher for eggs.
Pro Tips for Flawless Poached Eggs
Getting the hang of an egg poacher is pretty straightforward, and you'll get decent results just by following the basic steps. But if you want to go from decent to absolutely divine, there are a few little tricks of the trade that seasoned cooks swear by.
These are the tiny details that make all the difference, giving you that perfect texture—a tender, delicate white that perfectly encases a luscious, runny yolk. Think of it as the secret handshake for poaching perfection. A little attention to your ingredients and a couple of common pitfalls to sidestep, and you'll nail it every time.
Start with the Freshest Eggs Possible
If you take away only one piece of advice, let it be this one. It's non-negotiable. The freshness of your egg dramatically changes the final result. Why? Because really fresh eggs have thick, tight whites that hold their shape beautifully in the poaching cup.
As an egg gets older, its white becomes thinner and more watery. When you try to poach it, it tends to spread out, leaving you with a wispy, less-than-perfect shape and a slightly tougher texture. For the best poach of your life, always grab the freshest eggs you can find. It’s a simple switch that pays huge dividends.
While specific data on egg poaching mishaps in Australia isn't readily available, industry reports do show that small-scale producers sometimes face challenges that affect the egg supply chain. For both home cooks and professional kitchens, a reliable source of fresh eggs is key. You can get a better sense of the Australian egg industry by looking into official reports.
Common Mistakes to Avoid
Even with a handy tool like an egg poacher, a couple of small missteps can trip you up. Keep these common blunders in mind, and you'll stay on the path to success.
- Using High Heat: A roaring, rolling boil is the enemy of a delicate poached egg. Too much heat creates aggressive steam that blasts the whites, turning them tough and rubbery. You're always aiming for a gentle, lazy simmer.
- Forgetting to Grease the Cups: Don't skip this, even if you have a non-stick poacher. A quick wipe of butter or a light spray of oil is your insurance policy for a flawless release. It stops any part of the egg from sticking and tearing when you try to lift it out.
- Overcrowding the Pan: If you're using individual silicone poaching pods, make sure they have a bit of elbow room. Jamming too many into a small pot can drop the water temperature and cause everything to cook unevenly.
The goal is always gentle, even cooking. By controlling the heat and prepping your poacher correctly, you create the ideal environment for the egg to steam to perfection without any stress.
Troubleshooting Common Issues
Even with the best intentions, things can sometimes go a little sideways. Here’s a quick guide to fixing the two most common problems you might run into.
Problem 1: Undercooked, Watery Whites
This is an easy fix. If the whites still look a bit translucent or loose, they just need a bit more time. Pop the lid back on the pan and let them steam for another 30-60 seconds. That little extra burst of heat is usually all it takes to set them perfectly without turning the yolk solid.
Problem 2: Overcooked, Firm Yolks
Ah, the dreaded hard yolk. This is purely a timing issue. The first time you use your poacher, it's smart to cook just one egg as a test run to find the sweet spot for your particular stovetop. Once you find that magic number, make a note of it, and you’ll be able to replicate it every time. Just remember the golden rule: you can always cook an egg a little longer, but you can’t un-cook it.
Easy Cleaning and Care for Your Egg Poacher
A great kitchen tool shouldn't create a cleaning nightmare, and your poacher for eggs is designed to be hassle-free from cook to clean-up. Keeping it in top shape is incredibly simple, making sure it stays a reliable part of your breakfast routine for years to come.
The secret is just matching your cleaning method to the poacher’s material. Most modern egg poachers have non-stick surfaces, which makes washing up a breeze. For these, a quick hand-wash is your best bet. A soft sponge, some warm, soapy water, and any leftover egg will wipe away instantly.
Hand-Washing vs The Dishwasher
While you might see "dishwasher-safe" on the box, hand-washing is usually the smarter long-term move for the non-stick cups. Why? The intense heat and harsh detergents inside a dishwasher can slowly wear down non-stick coatings, making them less effective over time. A gentle wash in the sink takes less than a minute and will massively extend its life.
Think of it like this: a quick, gentle wipe-down preserves that slick surface, guaranteeing your eggs slide out perfectly every single time. It's a tiny investment of time for lasting performance.
For stainless steel or silicone models, you've got a bit more flexibility.
- Stainless Steel: These are built tough and can generally handle the dishwasher without a problem. If you get any stubborn spots, a non-abrasive scourer will do the trick.
- Silicone Pods: These are the champions of convenience. Just pop them on the top rack of your dishwasher, and you're good to go.
Knowing what cookware can handle the dishwasher makes a huge difference. You can learn more about which pans are truly dishwasher-safe to keep all your kitchen gear in great condition.
Smart Storage Solutions
How you store your poacher is just as important as how you clean it. To avoid scratching any non-stick surfaces, try not to stack other metal utensils inside the poaching cups.
If you’re tight on space and need to stack parts, just place a small cloth or a piece of paper towel between them to act as a buffer. This simple habit keeps your poacher for eggs ready for action, preventing the kind of damage that can ruin its performance.
Protecting your kitchen tools is always a smart move for a home cook. While it’s on a much smaller scale, it’s a bit like the challenges faced by the Australian egg industry, a $1.37 billion sector where theft is estimated to cost hundreds of thousands each year. You can discover more insights about the Australian egg farming industry.
Creative Ways to Serve Poached Eggs
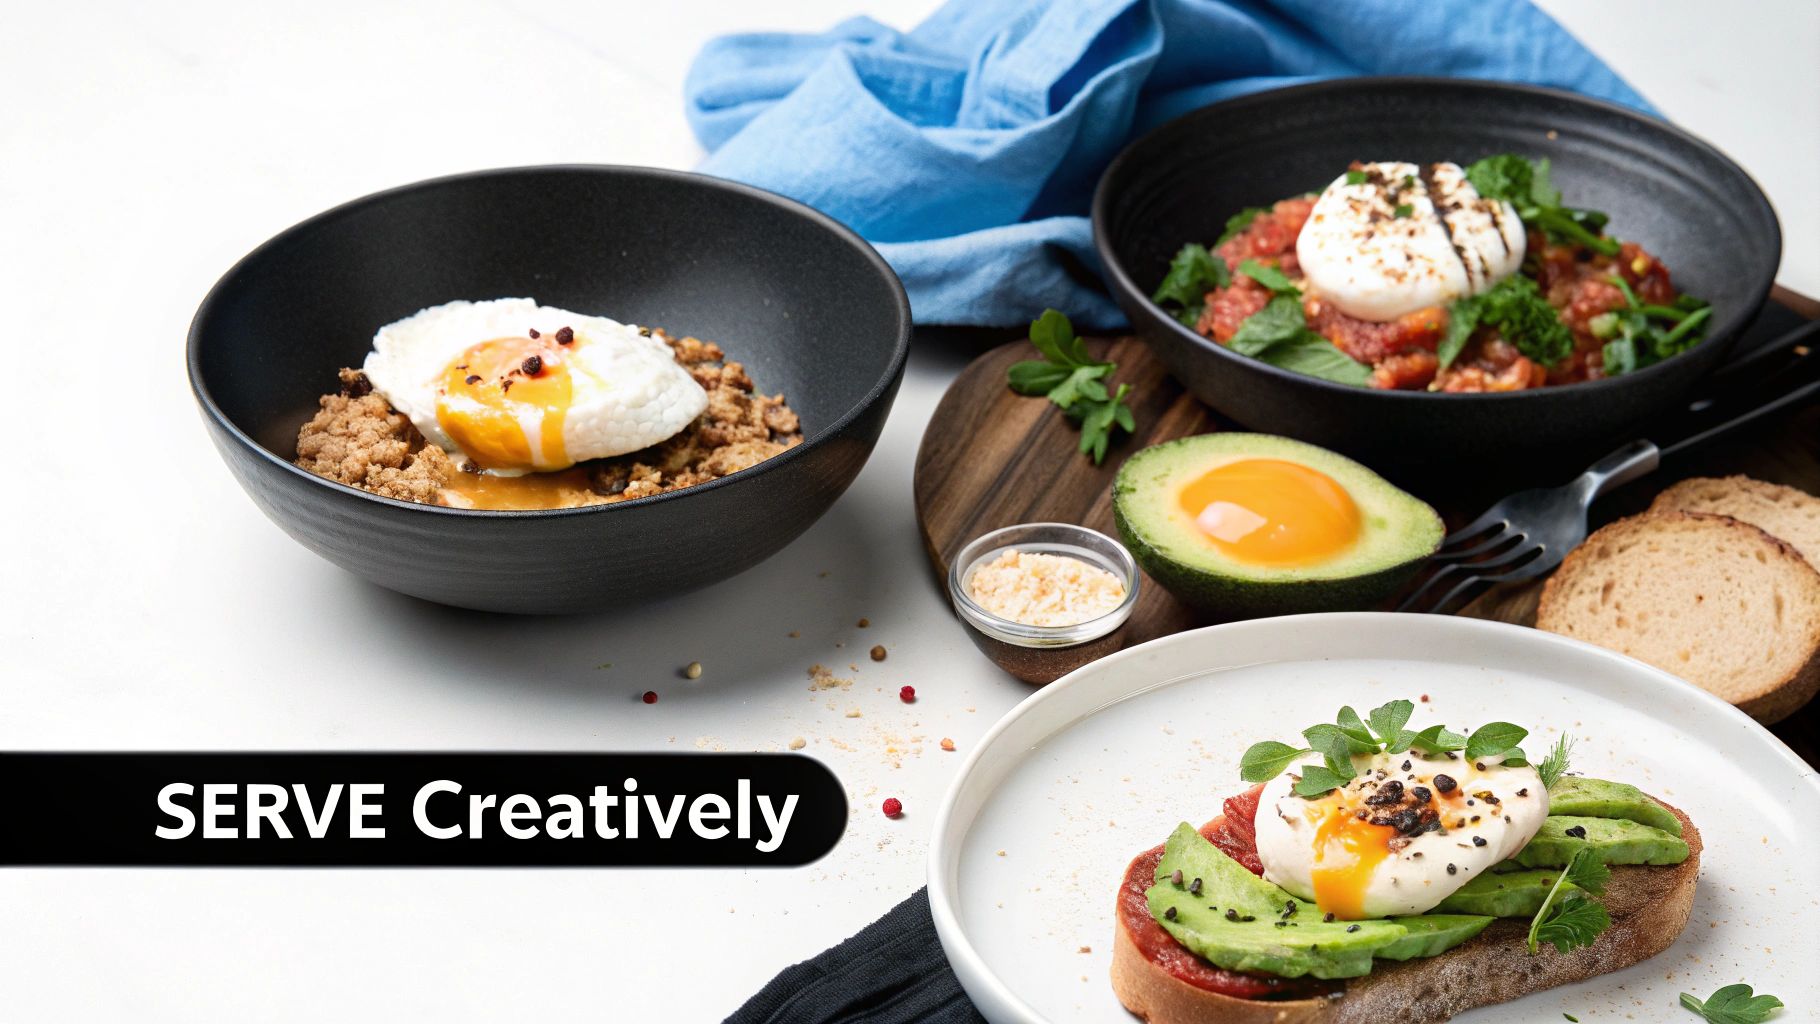
A perfectly poached egg is a thing of beauty—a delicate, silky white giving way to a rich, liquid gold yolk. While it’s absolutely sensational on a simple piece of toast, its versatility can elevate so many other dishes. Your poacher for eggs isn't just a gadget for your morning routine; it's your ticket to creating impressive meals any time of day.
It's time to think beyond the classic eggs Benedict and explore what a perfectly cooked egg can really do. Poached eggs bring richness, protein, and a luxurious, built-in sauce that can turn a good meal into a truly great one.
Beyond the Basics
Ready to get creative? Here are a few inspiring ideas to show you just how much a poached egg can bring to the table.
-
Elevated Avocado Toast: Take this café staple to the next level. Top your smashed avocado with a wobbly poached egg, then finish it with a sprinkle of chilli flakes, flaky sea salt, and a scattering of fresh coriander. The combination is a flavour explosion.
-
Vibrant Grain Bowls: This is where that poached egg really shines. Build a wholesome bowl with a base of quinoa or brown rice, then pile on roasted vegetables, fresh greens, and maybe a scoop of hummus. Crown it all with a poached egg—when the yolk breaks, it creates a rich, creamy sauce that brings the whole dish together.
-
Spicy Shakshuka: This North African and Middle Eastern dish is practically made for poached eggs. After simmering a fragrant, spicy tomato and capsicum sauce, you simply make little wells and poach the eggs directly in the pan. The flavours meld together for a deeply hearty and comforting meal.
The true beauty of a poached egg is its ability to add a touch of luxury to everyday ingredients. It’s a simple way to make any meal feel a little more special and complete.
Don't stop there, though. These ideas are just the beginning. Try popping a poached egg on a burger, letting the yolk run over a bowl of pasta, or placing one atop a warm lentil salad. You’ll be surprised at how it transforms the dish.
Got Questions? We've Got Answers
Even the simplest kitchen tools can have a few quirks. Let's tackle some of the most common questions about using an egg poacher, so you can get a flawless result every single time.
Do I Still Need to Add Vinegar to the Water?
Nope, you can put the vinegar bottle away. That old trick is for when you're poaching directly in a pot of water, as the acid helps the egg white firm up and stop it from spreading everywhere.
Since your egg poacher cups are already doing the job of containing the egg, adding vinegar is totally unnecessary. In fact, it can leave your eggs with a slightly sour taste you probably don't want. Just plain water is all you need.
Why Are My Eggs Sticking to the Cups?
Ah, the classic sticking problem. Nine times out of ten, this happens because the cups weren't greased beforehand. Even with non-stick surfaces, a tiny bit of butter, oil, or a quick spritz of cooking spray makes all the difference.
Think of it as a little insurance policy. It's a quick 10-second step that guarantees your beautifully cooked egg will slide right out without a fight, keeping its delicate shape intact.
A quick wipe of butter or oil is the secret to a perfect release. This simple prep step is what makes the non-stick surface truly foolproof, preventing any frustrating tears or messy cleanups.
How Long for a Perfectly Runny Yolk?
The sweet spot for a gloriously runny, liquid gold yolk is usually 4 to 5 minutes over a gentle, steady simmer. Of course, every stovetop is a little different, so you might need to adjust slightly.
If you like your yolks a bit different, here’s a good guide:
- For a soft, jammy yolk: Try cooking for about 6 minutes.
- For a fully firm, set yolk: Aim for 7-8 minutes.
My best advice? The first time you use your poacher, cook just one egg as a test. Once you nail the timing for your stove, you'll be able to make perfect poached eggs on repeat.
Ready to achieve breakfast perfection with tools designed to last a lifetime? Explore the pure titanium cookware collection at Everti and feel the difference quality materials make. Visit https://everti.com.au to find your new favourite kitchen tool.